

Choosing an LED strip for your swimming pool isn’t just a matter of working out how many metres you need.
You should also be aware that:
- if it works at 12 V or 24 V;
- how much it consumes per metre;
- how many metres you are going to install;
- how far away the fountain will be;
- whether you will be using one or more strips;
- and what cable cross-section is required for each route.
If it is not calculated correctly, the following may occur voltage drop and the strip may not be under the expected tension.
To avoid having to do all these calculations by hand, we have created a calculator specifically for LED strip installations.
1. Before calculating the cable length: choose the right LED strip
The first thing is to know exactly which product you are going to install. Do not calculate the cable length using approximate figures. Always check the technical data sheet:
- Voltage
12 V or 24 V. - Type of current
For example, 12 V DC. - Power
Usually expressed in W/m. - Length
Metres of strip that you are going to use. - Type of lighting
White or RGB. - Number of drivers
For example, 2-wire or 4-wire RGB.
For swimming pool installations, you should also check that the strip is designed for that application. The TRYLED Flexible Neon LED Strip, IP68 It is currently available in 12 V and 24 V DC, and in cool white, warm white and 4-wire RGB. You can also view the full range of Trypool swimming pool lighting.

How to use the LED strip cable calculator
You don’t need to do the calculations by hand. The tool is designed so that you can enter the actual details of the installation and compare different options.
Step 1. Select the voltage
Please indicate whether the strip operates at:
12 V
or:
24 V
Always use the voltage specified in the product data sheet.
Step 2. Enter the W/m
Find the power of the strip.
For example:
10 W/m
If you’re going to install 4 metres:
10 × 4 = 40 W
The calculator will perform this calculation automatically.
Step 3. Enter the number of metres of tape
It indicates only the length of each strip.
Example: 3.5 m
You can then specify how many identical strips you are going to install.
Step 4. Enter the number of strips
For example:
1 strip/ 2 strips/ 3 strips
This figure is important because it increases the total power output of the system.
Step 5. Enter the distance from the source
Measure from the power supply to the strip. If there is:
20 metres
Enter: 20 m
Do not enter 40 m. The calculator already takes the required electrical distance into account internally.
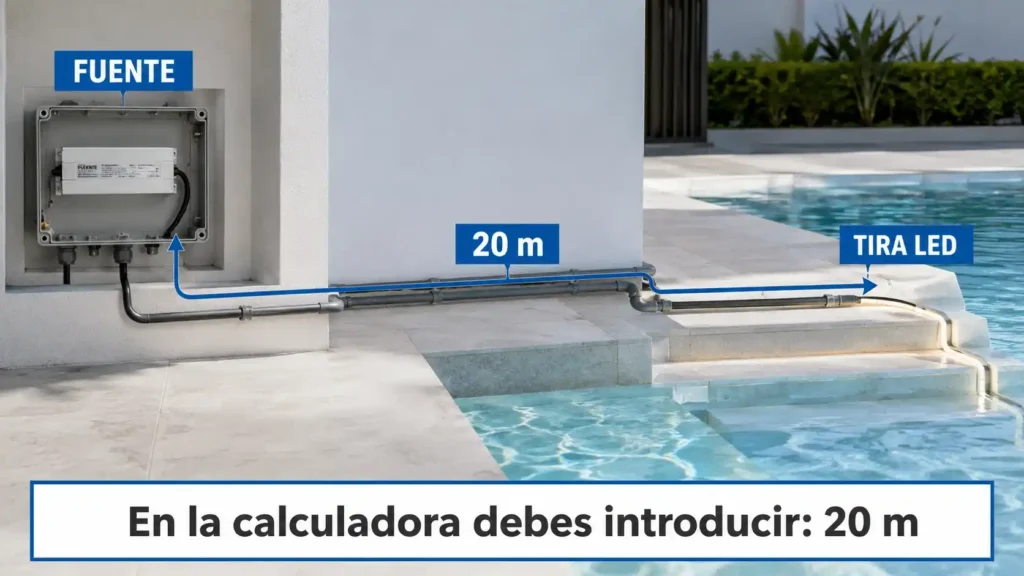
Image generated using artificial intelligence*
Step 6. Choose the type of strip
Select:
White — 2-ply o RGB — 4-wire
The tool adjusts the calculation to the selected settings.
Step 7. Explain how you are going to wire several strips
If you’re going to install several, you can choose from:
Standard cable o Separate cable per strip
This information may significantly affect the required section.
Step 8. Insert the cable that is soldered to the strip
If the strip includes, for example:
20 cm of 0.34 mm² cable
Enter these values as well.
Although it is a short stretch, it forms part of the circuit.
Step 9. Choose between single-ended or dual-ended power supply
You can specify:
Feeding from one end o Feeding from both ends
If you select two end points, enter the distance for each route.
Step 10. Enter the section you want to check
For example:
1.5 mm²/ 2.5 mm² / 4 mm²
The calculator will check that section and will also display the recommended commercial section based on the data entered.
3. How to interpret the calculator’s result
Once you have entered the data, focus primarily on four values:
Total power
This is the power consumption of all the connected strips.
Current
State the amperes that the circuit will need to carry.
Voltage drop
It indicates how much voltage is lost along the route.
Recommended section
This is the commercial section suggested by the tool based on the data entered and the configured drop criteria.
The calculator initially uses a criterion based on the maximum drop in the 3 %, which can be amended.
For example, at 12 V:
3 × % at 12 V = 0.36 V
Therefore:
12 − 0.36 = 11.64 V
The calculator serves as a tool to assist in analysing voltage drop. The complete installation must also verify the capacity of the conductors, the power supply, the controller, the protective devices and the applicable electrical requirements.
4. Why does distance have such a big impact?
Because the cable has resistance. The longer the distance, the greater the voltage drop may be if we maintain the same cross-sectional area. Let’s look at a very simple example.
Panel: 10 W/m
Length: 3.5 m
Power: 10 × 3.5 = 35 W
At 12 V: 35 ÷ 12 = 2.92 A
It is not the same to carry that 2.92 A for: 2 metres that during: 20 metres
That is why two installations using exactly the same strip may require different cables.
5. What happens if we install several LED strips?
The powers are added together. For example:
We have two strips of: 35 W each
Total power:
35 + 35 = 70 W
At 12 V:
70 ÷ 12 = 5.83 A
But there is another important point:
Do the strips share a cable or do they have separate circuits?
Standard cable
SOURCE
   ↓
MAIN CABLE
   ├── Strand 1
   └── Strand 2
The main section carries the current from both strips.
Separate lines
SOURCE
├── Cable 1 → Strip 1
└── Cable 2 → Strip 2
Each journey is calculated separately.
The calculator allows you to compare the two configurations.
6. Feeding from one or both ends
A strip can be powered from a single end:
CONTROLLER → [ LED STRIP ]However, in certain installations, it may be advisable to supply power from both ends:
              → END A
CONTROLLER
 → END B
This can be helpful when we want to minimise voltage differences along a long strip.
The calculator allows you to select the following directly:
Feed from both ends and enter the distance to each side.
7. Very important: both ends must be connected to the same modulator
If you feed a strip in from both ends, We do not recommend using two separate modulators.
Even if you need to lay more cable, both ends must come from the the same modulator or controller.
Correct
Power supply
 ↓
RGB modulator itself
 ├────→ end A
 │
 └────→ end B
Not recommended
Modulator 1 → end A
 [ LED STRIP ]
Modulator 2 → end B
Two independent modulators could send different signals to the same strip.
At Trypool, you can browse the range of swimming pool lighting controllers.
8. How to connect several LED strips
When there are several strips, we recommend planning the installation in parallel.
For example:
Source
   ↓
Modulator
   ├── Strip 1
   ├── Strip 2
   └── Strip 3
And if each strip needs to be powered at both ends:
Source
   ↓
Same modulator
   │
   ├── Strip 1 → end A
   │ → end B
   │
   ├── Strip 2 → end A
   │ → end B
   │
   └── Strip 3 → end A
 → end B
We do not recommend connecting all the strips one after the other as if they were a single, very long strip.
Before you do that, always add up:
total power + total current
and check the capacity of the power supply and the modulator.
9. 12V or 24V?
One of the advantages of the calculator is that you can change the voltage and see what happens.
Let’s take a look at an installation of:
100 W
12 V
100 ÷ 12 = 8.33 A
24 V
100 ÷ 24 = 4.17 A
For the same power, increasing the voltage reduces the current. This can make design easier when dealing with significant distances. But be careful:
12V DC and 24V DC are not interchangeable
The strip, power supply and controller must be compatible with the chosen voltage.
You can look up, for example:
10. 4-wire RGB strips
On a four-wire RGB strip, you will normally find:
common positive + R + G + B
If the strip is powered from both ends, the connections must match.
END A TO END B

+  ─────────────────  +
R  ─────────────────  R
G  ─────────────────  G
B  ─────────────────  B
In other words:
+ → +
R → R
G → G
B → B
Channels must not be crossed, nor must connections be reversed.
You can also check out our content on Wi-Fi control of swimming pool lighting to find out about other ways of controlling the system.
12. Which LED strip should you use in a swimming pool?
Calculating the cable length only makes sense if we first choose a product that is ready for installation.
For this type of project, you can consult the TRYLED Flexible Neon LED Strip, IP68.
The current entry includes versions of 12 V and 24 V DC, cool white, warm white and 4-wire RGB.
To complete a project, you can also have a look at:
13. Checklist before installation
Before feeding through the first cable, check:
- Tension in the strip.
- AC or DC.
- W/m.
- Metres of each strip.
- Number of strips.
- Total power.
- Total current.
- Distance from the source.
- Section of each route.
- Fountain capacity.
- Modulator capacity.
- Shared or separate cable.
- Feeding from one or both ends.
- Connecting the strips in parallel.
- Correct polarity.
- R, G and B values.
- If there is a dual power supply, both ends are connected to the same controller.
Frequently asked questions
It depends on the power, current, distance and configuration of the installation. There is no single cross-section that applies to all projects.
No. Simply enter the distance from the source to the strip. The tool performs the relevant calculation internally.
This is because as the length increases, the conductor’s resistance increases, which can lead to a greater voltage drop. One way to reduce this is to use a larger cross-section.
The common section will have to carry the current for all the connected strands. The calculator allows you to compare a common cable with separate lines.
It depends on the project. For the same power output, less current flows at 24 V than at 12 V. You must always use a strip, power supply and controller that are compatible with the selected voltage.
Yes, provided the product’s settings and instructions allow it. The calculator enables you to work out the distances for both routes.
This is not the configuration we recommend. If a single strip is powered from both ends, both power supply lines must originate from the the same modulator or controller.
For this type of project, we recommend setting them up in parallel and calculating the corresponding circuits, ensuring that the total power and current do not exceed the equipment’s capacity.
Content created using AI


 Español
 English (UK)
 Français
 Português